


Sunday, January 24, 2010


Once in place, it definately took command of the room which is what I had hoped for. Originally there had been a fireplace in this location but that too was removed by a previous owner. Although I had restored two of the missing fireplaces on this floor, I felt this room would benefit from something different.


Thursday, January 21, 2010
Craze became the Rage
It seems I was infatuated with the possibilites of Crystal Craze after doing one window so I began looking for other places to use the product.
Because the pantry had four glass doors and a lot of mismatched china and glasswear, I thought obscuring the glass with Crystal Craze would be a practical solution to the cluttered look.
Because the pantry had four glass doors and a lot of mismatched china and glasswear, I thought obscuring the glass with Crystal Craze would be a practical solution to the cluttered look.
 I noticed a Sears ad in the Sunday paper that consisted of a stylized fruit arrangement. Fruit at Sears? I think it was around the holidays and was more of a sponsorship thing than an ad. But I saw how the pattern could be embellished to cover the eight panels in my pantry doors and I was off and running. (Yes, that is Cookie Monster hiding in the shadows.)


Sunday, January 17, 2010
EYESORE TO EXQUISITE
When I purchased my house in 1977, a few of the original items had been removed from the house by a previous owner. One of these items was the large stained glass window that overlooked the staircase. The opening had then been divided into four parts and fitted with amber colored plexiglass which was --no kidding--the ugliest thing in the house.


As time went by, the colors started to fade and the paint began to flake from the heat and light of the sun. I had always planned to find an art glass window to replace this one but other things seemed to take priority. One day I came across a pattern in an old library book and it just clicked with me. I took the pattern to a glass artist who altered it slightly to fit the size of my window opening. Next came the fun part of selecting the glass in colors and textures of my choice.This was a little more difficult than you might think as there was not a good way to lay it out before making a decision. I had to trust the image in my head and just go for it!

Wednesday, January 6, 2010
The Luxury Of Two Baths.
Even though I grew up in a one bathroom house with 3 brothers and 3 sisters, and know it is doable, I now had the space and, well, why not? As you know from the post about the main bathroom,(the only one at the time) there was a water closet next to that bath. Once a toliet was added to that bath, it was no longer necessary to have access to this one from the hall. Thus began the process of adding another full bath backing up to the main bath.

 As you can see from this shot, a wall had divided these two windows. The window on the left was over the toliet in the water closet and the one on the right was at the end of a deep, narrow closet. There were shelves along one wall as you can see by the paint marks. I can't believe these windows were originally divided in this way but guess I will never know the answer to that one.


 Then came the idea to change the tile and run it up the wall behind a pedestal sink. The wallpaper lost out as the faux finish bug was in full swing. The walls and ceiling were lightly washed in a pale apricot and the wood trim received a rubbed back distressed green finish that matched the color of the shower.


Wednesday, December 9, 2009

Recycle? You bet!

That old sink that came with the house has a new life. It now resides in a snappy new loft apt. The legs are gone and the faucets are new but it's the same sink...no refinishing necessary.
Saturday, November 28, 2009
A bathroom begs for transformation.

 As we know bathroom rehabs can be mighty expensive. So the bathroom stayed as it was for a while until I decided a little paint and wallpaper would be a cheap fix if I did the work myself. Although blue is not my first color choice, I thought I should pick up the color of the floor tile and incorporate it around the room.


 Then a light bar was added. A stub wall created a partial divide and concealed the plumbing for the new vanity. The tub took a 90 degree turn to end up under the medicine cabinet. This arrangement allowed the toliet to be hidden behind the stub wall and no longer secluded in the water closet. (That closet was destined for greater things which will be revealed in the next post.)


Crown moulding was added at the ceiling and painted along with the ceiling in black.

A six armed chandelier with golden pleated shades topped all this drama. The room has survived to this day because it was a very tight squeeze getting the amoire into the room and I don't have plans to reverse that process.
Friday, September 4, 2009
BEFORE & AFTER
Let's face it. I'm addicted to transformations and nothing satisfies that craving like a quick fix of before and after photos. It's the first page I turn to in a magazine. I devour every detail and scrutinize every change. So it is no wonder I kept a few of my very own B & A's. Although there are many, I have selected just a few that are featured in my bedroom to this day.


So I applied what is called a seven layer peel. The "peeled paint look" is achieved by applying a substance tinted to the desired color and then removing parts by lifting the substance with paper towels. This process is repeated with different colors to resemble layers of paint that have chipped away to reveal the color beneath each coat. It is quite time consuming but rewarding if you have the patience. (Normally not my strong suit but I can overcome for the right goal.)
 I bought this screen sight unseen. A friend insisted I needed it and convinced me she should grab it before it disappeared. I was a bit surprised when I saw what I had purchased over the phone but I rallied and came up with a finish that worked for me.
I painted the entire piece a rather brilliant yellow and then added several washes in varying shades of yellow and peach. Although it has remained this color for several years, I doubt I will part with it in the move. I see another makeover in this little treasure.


I started by doing an eggshell crackle on the legs and wood base. Then came the fun part of selecting the upholstery fabrics. Yes, as in plural. There are a total of four fabrics on the chair: a toile, a stripe, a solid, and a check. Having an upholsterer who is happy to follow directions no matter how convoluted is the key to success. The stripe and the solid are both used for piping and the back is finished in the green and cream stripe.

I opted to try a few finishes on this piece
including decoupage and stenciling. Although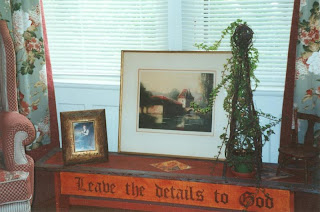
it is low to the floor it works very well under the
double windows and is another keeper that will
most likely see a reincarnation at some point.
Although I quote "Leave the details to God"
I couldn't resist adding a few of my own.
including decoupage and stenciling. Although

it is low to the floor it works very well under the
double windows and is another keeper that will
most likely see a reincarnation at some point.
Although I quote "Leave the details to God"
I couldn't resist adding a few of my own.
Sunday, August 16, 2009
The Big Discovery
The process of getting my house ready to market continues. I attacked the basement with renewed vigor today pushing aside cobwebs and reaching into the darkest and most remote corners. I poked into places that I have not looked into in 20 years. I made thousands of decisions in a matter of hours. Is this trash? Will it sell at a yard sale? Is there a spark of potential left in this? What is the shelf life of windshield washer fluid? How long does a 2x4 have to be to warrant saving it for a later project? Then there was the debate over flyswatters. How many do I need? (Never mind that I haven't used one in years) As soon as I throw it out there will arrive a pesky fly to drive me crazy. But do I need one for each hand?
It all gets a little overwhelming. BREAK TIME! Call a friend, laugh a little, have a beer and then get back at it. Today there was a bonus for my fortitude. I climbed onto a stool to scope out the top shelves of the dark and dirty storage lockers. I motivate myself to do this by envisioning myself opening a cigar box full of $100 bills. Come on. It happens sometimes. I found a stash years ago behind a partition in this very basement. There was an unopened bottle of Rum, a wrapped cigar, and an unloaded handgun. None of this was of much use to me but it was some one's treasure and it was hidden.
But today I found a strip of the vinyl flooring...the very one I spoke of in my first blog entry. At the risk of it being anticlimactic, I show it to you now.
It all gets a little overwhelming. BREAK TIME! Call a friend, laugh a little, have a beer and then get back at it. Today there was a bonus for my fortitude. I climbed onto a stool to scope out the top shelves of the dark and dirty storage lockers. I motivate myself to do this by envisioning myself opening a cigar box full of $100 bills. Come on. It happens sometimes. I found a stash years ago behind a partition in this very basement. There was an unopened bottle of Rum, a wrapped cigar, and an unloaded handgun. None of this was of much use to me but it was some one's treasure and it was hidden.
But today I found a strip of the vinyl flooring...the very one I spoke of in my first blog entry. At the risk of it being anticlimactic, I show it to you now.

Subscribe to:
Posts (Atom)